Difference between revisions of "Gin pole welding project"
(→Construction) |
|||
| (17 intermediate revisions by one user not shown) | |||
| Line 1: | Line 1: | ||
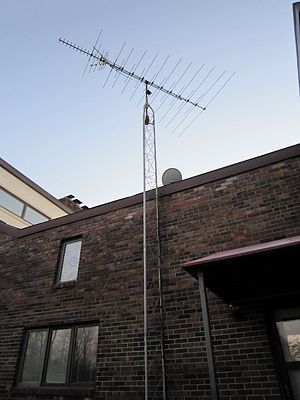
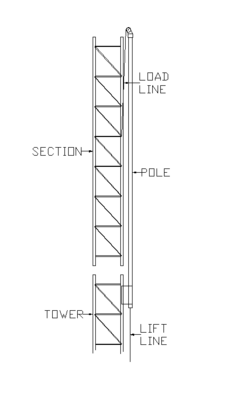
So what is a Gin Pole you may ask? And why would you want to build one? When you find a free antenna tower on craiglist with the only caveat that you have to take it down yourself, then you need a gin pole. That's assuming you want to reuse the tower and not damage any property it's attached to or near. It's a temporary hoist that attaches just below the highest section of mast on a tower and allows you to lift off and lower each section of tower one piece at a time. You use it the in reverse to assemble a tower. | So what is a Gin Pole you may ask? And why would you want to build one? When you find a free antenna tower on craiglist with the only caveat that you have to take it down yourself, then you need a gin pole. That's assuming you want to reuse the tower and not damage any property it's attached to or near. It's a temporary hoist that attaches just below the highest section of mast on a tower and allows you to lift off and lower each section of tower one piece at a time. You use it the in reverse to assemble a tower. | ||
| − | [[Image:Tower01.jpg|none|thumb|300px|Antenna tower]] | + | {| |
| + | | [[Image:Tower01.jpg|none|thumb|300px|Antenna tower]] | ||
| + | | [[Image:Gin_pole_diagram.png|none|thumb|230px|Gin pole]] | ||
| + | |} | ||
== Commercial gin pole kits and usage == | == Commercial gin pole kits and usage == | ||
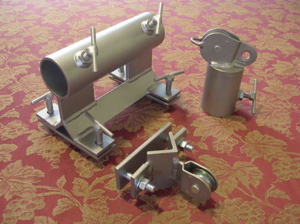
| − | Gin pole kits go from $150 on up (no pole included). I found this gin pole kit on ebay and almost bought it. Then I realized we have everything at Bloominglabs I needed to make my own, so I decided to make one after this design: | + | Gin pole kits go from $150 to $250 and on up (no pole included). I found this gin pole kit on ebay and almost bought it. Then I realized we have everything at Bloominglabs I needed to make my own, so I decided to make one after this design: |
[[Image:Ebay_gin_pole_kit.png|none|thumb|300px|Ebay gin pole kit]] | [[Image:Ebay_gin_pole_kit.png|none|thumb|300px|Ebay gin pole kit]] | ||
The large piece in the upper left attaches just below the highest section of the tower and a pole (most likely 10 feet long) attaches here. The part in the upper right with the pulley on top sits on top of the pole and this should be near the top of the tower. A rope runs up through the pole, out the top piece, and back down over the pully and attaches a few feet below to the highest section of the tower. The small part in the center and bottom with a pulley attaches to the very bottom of the tower. The rope coming down out of the bottom of the pole runs through this and into the hands of your assistant on the ground. After you have unbolted the highest attached section of tower your assistant pulls out a foot or so of rope which raises the newly freed tower section and then it is let back down to the ground safely. | The large piece in the upper left attaches just below the highest section of the tower and a pole (most likely 10 feet long) attaches here. The part in the upper right with the pulley on top sits on top of the pole and this should be near the top of the tower. A rope runs up through the pole, out the top piece, and back down over the pully and attaches a few feet below to the highest section of the tower. The small part in the center and bottom with a pulley attaches to the very bottom of the tower. The rope coming down out of the bottom of the pole runs through this and into the hands of your assistant on the ground. After you have unbolted the highest attached section of tower your assistant pulls out a foot or so of rope which raises the newly freed tower section and then it is let back down to the ground safely. | ||
| + | |||
| + | == Parts list == | ||
| + | {| | ||
| + | | 1 1/4" x 10' galv pipe|| $22.89 | ||
| + | |- | ||
| + | | 1/8"x1"x1-1/4" angle steel|| $14.98 | ||
| + | |- | ||
| + | | 1/8"x2"x3' angle steel|| $12.47 | ||
| + | |- | ||
| + | | 3/16"x2"x3' flat bar|| $7.27 | ||
| + | |- | ||
| + | | 3/16"x3' steel rod|| $1.87 | ||
| + | |- | ||
| + | | 3/8" 50' rope 135lb test|| $16.99 | ||
| + | |- | ||
| + | | 2" pulleys x 2|| $17.98 | ||
| + | |- | ||
| + | | 3/8"-16 hex nuts|| $5.97 | ||
| + | |- | ||
| + | | 3/8" carrbolt 14pcs|| $1.58 | ||
| + | |- | ||
| + | | Total|| $79.11 | ||
| + | |} | ||
== Construction == | == Construction == | ||
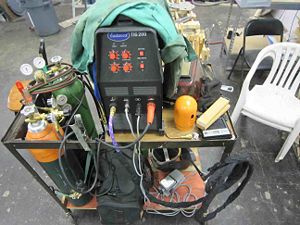
| − | I took a welding class a couple years ago but I spent most of my time then doing MIG. Adam at our space has brought in a nice TIG machine | + | I took a welding class a couple years ago but I spent most of my time then doing MIG. Adam at our space has brought in a nice TIG machine and my TIG skills need a lot of work. Adam was kind enough to give me a thorough TIG lesson on a slow Sunday. I was able to knock out 99% of this project in a half day with his help. |
{| | {| | ||
| Line 18: | Line 44: | ||
|} | |} | ||
| − | I made extensive use of our horizontal bandsaw to get my raw material sectioned into the right sizes. All of the metal stock I used came from a local mega home store and another hardware store in town. I sized my kit to support a 1 | + | I made extensive use of our horizontal bandsaw to get my raw material sectioned into the right sizes. All of the metal stock I used came from a local mega home store and another hardware store in town. I sized my kit to support a 1-1/4" rigid conduit pole. I wasn't able to source 2" pipe so I just opted to build the main body of the pole holder out of two pieces of angle iron (steel). |
Here are some of my first welds on this project: | Here are some of my first welds on this project: | ||
{| | {| | ||
| [[Image:Ginpole02.jpg|none|thumb|300px|Gin pole bottom pully]] | | [[Image:Ginpole02.jpg|none|thumb|300px|Gin pole bottom pully]] | ||
| − | | [[Image:Ginpole01.jpg|none|thumb|300px|Gin pole | + | | [[Image:Ginpole01.jpg|none|thumb|300px|Gin pole mast attachment]] |
|} | |} | ||
| Line 33: | Line 59: | ||
| − | As you can see, I've over-engineered this device because I really really don't want anything to go wrong when using it. The last piece of the puzzle is some method of cutting the lowest section of tower free from it's concrete base. I'll be using a saws-all for this purpose, there are many ways | + | There are a couple things that may not be immediately obvious about construction. First, the pulley cap that sits at the top of the pole has a hole drilled into the top horizontal plate the pulley is welded to. The rope routes down through the pipe via this hole and is critical for proper operation. Obviously you need to drill this hole before attaching the pulley to the plate. |
| + | |||
| + | Also, the pulley that mounts at the bottom of the tower has to be cut so it can be welded to its mast mount clamp. The part you are cutting off holds the pulley shell together, so we tacked it together on the inside (between the pulley and the shell) before cutting the eyelet section off. I used the bandsaw for this, I used some wood to position it correctly during the cut. | ||
| + | |||
| + | Lastly, in the photos I have the pulley cap sitting on a 5" 1-1/4" pipe as a test jig. This pipe has no other purpose, it was just for testing components before I purchased the full 10' length pipe. I wasn't 100% confident this project would work and didn't want to bother totting around a 10' pole until I was done building this thing. | ||
| + | |||
| + | == Finished == | ||
| + | {| | ||
| + | | [[Image:IMG_4431.JPG|none|thumb|250px|Gin pole kit parts]] | ||
| + | | [[Image:IMG_4440.JPG|none|thumb|250px|Gin pole assembled with rope]] | ||
| + | | [[Image:IMG_4436.JPG|none|thumb|300px|Gin pole top pully]] | ||
| + | |} | ||
| + | |||
| + | As you can see, I've over-engineered this device because I really really don't want anything to go wrong when using it. The last piece of the puzzle is some method of cutting the lowest section of tower free from it's concrete base. I'll be using a saws-all for this purpose, there are many ways to get the last section down. | ||
| + | |||
| + | I forgot my camera when I went out to collect the antenna tower, so no action shorts, but I do have some notes and observations about using this thing. | ||
| + | |||
| + | == Usage == | ||
| + | First, assemble the pole when you get on-site. Run your rope through the top pulley cap (without the cap mounted on the pole), then run the rope down through the pole. You will need to let gravity pull the rope through. so tilt the pole up as far as you can and jam rope down it. Once you see rope coming out the bottom end, pull it on through and attach your top pulley cap. Next put the mast mount onto the pole. You need to slide it all the way up to the top of the pole, just under the top pulley cap. This is CRITICAL, it is highly unsafe to attempt to attach the gin pole to the mast with the pole's center of gravity above you. Now you are ready to climb the tower with your gin pole. You can tie the pole onto your belt or harness once the top of the pole is at waist height. | ||
| + | |||
| + | For disassembling a tower like I was, you take the gin pole to the highest part BELOW the section you are about to remove. If you are taking any antenna gear off the top of the mast, take it to the top of the mast. Then very carefully attach the pole to the mast. Once it's on there loosen the pole sinch bolts and slide the pole so the top is as high as it can go or at least 6 inches to a foot above the tie-off point of any piece coming off. Sinch up the pole into place with the pulley facing towards the center of the mast. Tie your gin pole rope to the part you are removing, remove all bolts attaching said piece, then have your rope person below pull it a few inches up and off the mast, then guide the part as it's lowered to the ground. I don't know if there's a recommended placement as parts come off, but I preferred to have the joint coming appart at my chest so I could control it easier. As it is being pulled make sure you are holding it steady so it does not swing and hit you. Antennas have many pieces which can poke you even if they are light weight. The top section of a tower can be deceivingly top-heavy. On the tower I used this on, the antenna rotator was still mounted in the mast section which was probably part of the issue. Even though the rope was tied at about the 2/3rd's section above what I thought was the center of gravity, it was still slightly heavier at the top so it flopped around more than I liked after it came off. Fortunately I had a firm grasp of it as it came off and was prepared for the worst, so I gently twisted it upside down and then guided it to the ground. | ||
| + | |||
| + | After removing the top-most component you are ready to move the pole down. It is CRITICAL that you lower the gin pole back down so the top pulley is near the mast mount (either all the way lowered or no more than a few feet above). Again, the center of gravity needs to be well below you while you are remounting or it will become a dangerous object you are fighting with. Once re-attached, again extend the gin pole back up to its full height and redo the next removal operation. Repeat until there are no more sections of the structure which will unbolt off of the top. Also be VERY careful to not loose control of the pole as it's sliding down. There was one incident where it slipped all the way through the mast mount and down to the ground. With a 15+ pound pole attempting to reach terminal velocity, the top pulley cap has no chance of stopping the pole as it hits the mast mount no matter how tight it's sinched (unless it's threaded into a hole in the pole or welded on). Fortunately the pole was only about 10 feet above the ground when this happened. | ||
| + | |||
| + | == Final thoughts == | ||
| + | |||
| + | The gin pole worked and got me a free 30' antenna tower. But I'm not going into the antenna mast removal business anytime soon. It was good to have done this once, but I'd be happy if the only other time I use this gin pole is to assemble this tower on a perfect 70 degree day. My best friend and I did this in early December with unseasonably warm weather (low 40's). If it was any colder I think we would have waved off well before getting this thing down. We powered through and got the job done though. | ||
| + | |||
| + | There was one small piece I left out of my setup from the ebay kit I found. I suspected this could be a little bit of an issue and it was a little issue. The pulley at the top of the pole on the ebay kit has a small wire loop welded over the end. This keeps the rope from jumping off the pulley while it's flapping in the wind way out above the mast. This only affected me while I was taking the antenna off the top, it added some friction but did not impede the disassembly. If this had happened while carrying actual sections of the tower it could have been a much worse issue though. | ||
| + | |||
| + | Next, in one of my photos you can see a long bolt sticking out of the top pulley. It is fully tightened and locked on the pole. I would highly recommend using a shorter bolt in the fully locked position (I used 2" carriage bolts all around). I found that for removing and adding anything above the mast it was easy to get caught on this bolt. As I attempted to extend the pole above the existing antenna this was a very annoying problem. Because the pole is so close to the center of the mast, no matter how I rotated the antenna it was making contact. I was able to force it past, but this bolt was awful. | ||
| + | |||
| + | So my kit fully assembled had some decent weight to it. I made my pole-to-mast attachment about 15 inches long. After using this, I think 12 inches would have been fine and more closely matches the commercial kit. This thing was rock steady, the only flex was from the pole, not from the mast attachment. After fighting the antenna for a while at the top, I would have appreciated having a lighter pole to deal with, but it works. | ||
| + | |||
| + | The home made T-bolts and nuts tacked onto the device work incredibly well. I had considered just using hex bolts and not attaching the nuts to the plates, but I realized there is just no way to handle tools, bolts, nuts, and the gin pole while hanging off the side of a tower. Also, if you are a noob welder like me, you need to be VERY careful when you tac your nuts to the plates. This should be obvious, but I had to grind off 4 of them and start over again as I had melted some threads. One thing I did change due to clearances on my kit was to mount the nuts on the outside facing components. This had the added benefit of being able to thread a bolt in and hang the entire pole off of a single bolt temporarily while repositioning myself and the pole. | ||
| + | |||
| + | Make sure you have enough rope, but that should be obvious. 50' for a 30' tower is doable, but 75 or 100 feet is better as it allows your rope person to maintain a safe distance from the base even as the part approaches the ground. | ||
| + | |||
| + | The last thing I would add is a drill hole or other attachment device to the mast mount so you can have a lanyard for attaching the rig to your belt or harness. It's not critical, but a nice thing I think I may do before using it again. | ||
| − | [[Category:dosman projects]] | + | [[Category:dosman projects]] [[Category:Radio]] |
Latest revision as of 11:19, 3 January 2019
So what is a Gin Pole you may ask? And why would you want to build one? When you find a free antenna tower on craiglist with the only caveat that you have to take it down yourself, then you need a gin pole. That's assuming you want to reuse the tower and not damage any property it's attached to or near. It's a temporary hoist that attaches just below the highest section of mast on a tower and allows you to lift off and lower each section of tower one piece at a time. You use it the in reverse to assemble a tower.
Contents |
[edit] Commercial gin pole kits and usage
Gin pole kits go from $150 to $250 and on up (no pole included). I found this gin pole kit on ebay and almost bought it. Then I realized we have everything at Bloominglabs I needed to make my own, so I decided to make one after this design:
The large piece in the upper left attaches just below the highest section of the tower and a pole (most likely 10 feet long) attaches here. The part in the upper right with the pulley on top sits on top of the pole and this should be near the top of the tower. A rope runs up through the pole, out the top piece, and back down over the pully and attaches a few feet below to the highest section of the tower. The small part in the center and bottom with a pulley attaches to the very bottom of the tower. The rope coming down out of the bottom of the pole runs through this and into the hands of your assistant on the ground. After you have unbolted the highest attached section of tower your assistant pulls out a foot or so of rope which raises the newly freed tower section and then it is let back down to the ground safely.
[edit] Parts list
| 1 1/4" x 10' galv pipe | $22.89 |
| 1/8"x1"x1-1/4" angle steel | $14.98 |
| 1/8"x2"x3' angle steel | $12.47 |
| 3/16"x2"x3' flat bar | $7.27 |
| 3/16"x3' steel rod | $1.87 |
| 3/8" 50' rope 135lb test | $16.99 |
| 2" pulleys x 2 | $17.98 |
| 3/8"-16 hex nuts | $5.97 |
| 3/8" carrbolt 14pcs | $1.58 |
| Total | $79.11 |
[edit] Construction
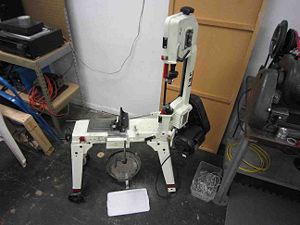
I took a welding class a couple years ago but I spent most of my time then doing MIG. Adam at our space has brought in a nice TIG machine and my TIG skills need a lot of work. Adam was kind enough to give me a thorough TIG lesson on a slow Sunday. I was able to knock out 99% of this project in a half day with his help.
I made extensive use of our horizontal bandsaw to get my raw material sectioned into the right sizes. All of the metal stock I used came from a local mega home store and another hardware store in town. I sized my kit to support a 1-1/4" rigid conduit pole. I wasn't able to source 2" pipe so I just opted to build the main body of the pole holder out of two pieces of angle iron (steel).
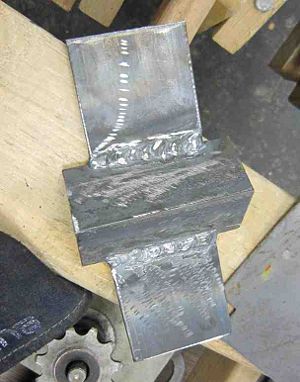
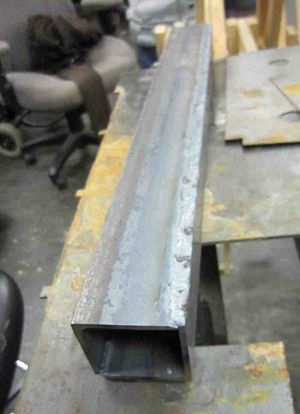
Here are some of my first welds on this project:
You can see nicer welds along the 2nd pic, of course those are Adam's ;-)
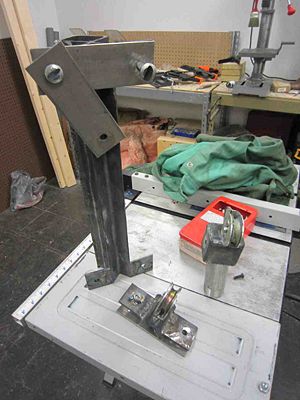
There are a couple things that may not be immediately obvious about construction. First, the pulley cap that sits at the top of the pole has a hole drilled into the top horizontal plate the pulley is welded to. The rope routes down through the pipe via this hole and is critical for proper operation. Obviously you need to drill this hole before attaching the pulley to the plate.
Also, the pulley that mounts at the bottom of the tower has to be cut so it can be welded to its mast mount clamp. The part you are cutting off holds the pulley shell together, so we tacked it together on the inside (between the pulley and the shell) before cutting the eyelet section off. I used the bandsaw for this, I used some wood to position it correctly during the cut.
Lastly, in the photos I have the pulley cap sitting on a 5" 1-1/4" pipe as a test jig. This pipe has no other purpose, it was just for testing components before I purchased the full 10' length pipe. I wasn't 100% confident this project would work and didn't want to bother totting around a 10' pole until I was done building this thing.
[edit] Finished
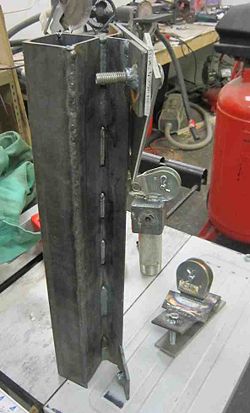
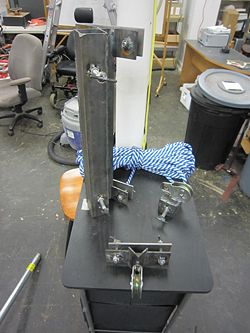
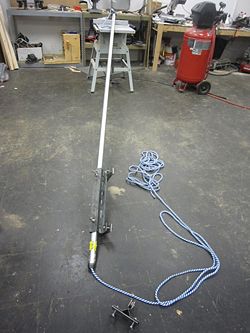
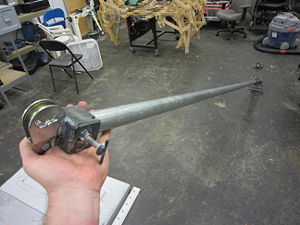
As you can see, I've over-engineered this device because I really really don't want anything to go wrong when using it. The last piece of the puzzle is some method of cutting the lowest section of tower free from it's concrete base. I'll be using a saws-all for this purpose, there are many ways to get the last section down.
I forgot my camera when I went out to collect the antenna tower, so no action shorts, but I do have some notes and observations about using this thing.
[edit] Usage
First, assemble the pole when you get on-site. Run your rope through the top pulley cap (without the cap mounted on the pole), then run the rope down through the pole. You will need to let gravity pull the rope through. so tilt the pole up as far as you can and jam rope down it. Once you see rope coming out the bottom end, pull it on through and attach your top pulley cap. Next put the mast mount onto the pole. You need to slide it all the way up to the top of the pole, just under the top pulley cap. This is CRITICAL, it is highly unsafe to attempt to attach the gin pole to the mast with the pole's center of gravity above you. Now you are ready to climb the tower with your gin pole. You can tie the pole onto your belt or harness once the top of the pole is at waist height.
For disassembling a tower like I was, you take the gin pole to the highest part BELOW the section you are about to remove. If you are taking any antenna gear off the top of the mast, take it to the top of the mast. Then very carefully attach the pole to the mast. Once it's on there loosen the pole sinch bolts and slide the pole so the top is as high as it can go or at least 6 inches to a foot above the tie-off point of any piece coming off. Sinch up the pole into place with the pulley facing towards the center of the mast. Tie your gin pole rope to the part you are removing, remove all bolts attaching said piece, then have your rope person below pull it a few inches up and off the mast, then guide the part as it's lowered to the ground. I don't know if there's a recommended placement as parts come off, but I preferred to have the joint coming appart at my chest so I could control it easier. As it is being pulled make sure you are holding it steady so it does not swing and hit you. Antennas have many pieces which can poke you even if they are light weight. The top section of a tower can be deceivingly top-heavy. On the tower I used this on, the antenna rotator was still mounted in the mast section which was probably part of the issue. Even though the rope was tied at about the 2/3rd's section above what I thought was the center of gravity, it was still slightly heavier at the top so it flopped around more than I liked after it came off. Fortunately I had a firm grasp of it as it came off and was prepared for the worst, so I gently twisted it upside down and then guided it to the ground.
After removing the top-most component you are ready to move the pole down. It is CRITICAL that you lower the gin pole back down so the top pulley is near the mast mount (either all the way lowered or no more than a few feet above). Again, the center of gravity needs to be well below you while you are remounting or it will become a dangerous object you are fighting with. Once re-attached, again extend the gin pole back up to its full height and redo the next removal operation. Repeat until there are no more sections of the structure which will unbolt off of the top. Also be VERY careful to not loose control of the pole as it's sliding down. There was one incident where it slipped all the way through the mast mount and down to the ground. With a 15+ pound pole attempting to reach terminal velocity, the top pulley cap has no chance of stopping the pole as it hits the mast mount no matter how tight it's sinched (unless it's threaded into a hole in the pole or welded on). Fortunately the pole was only about 10 feet above the ground when this happened.
[edit] Final thoughts
The gin pole worked and got me a free 30' antenna tower. But I'm not going into the antenna mast removal business anytime soon. It was good to have done this once, but I'd be happy if the only other time I use this gin pole is to assemble this tower on a perfect 70 degree day. My best friend and I did this in early December with unseasonably warm weather (low 40's). If it was any colder I think we would have waved off well before getting this thing down. We powered through and got the job done though.
There was one small piece I left out of my setup from the ebay kit I found. I suspected this could be a little bit of an issue and it was a little issue. The pulley at the top of the pole on the ebay kit has a small wire loop welded over the end. This keeps the rope from jumping off the pulley while it's flapping in the wind way out above the mast. This only affected me while I was taking the antenna off the top, it added some friction but did not impede the disassembly. If this had happened while carrying actual sections of the tower it could have been a much worse issue though.
Next, in one of my photos you can see a long bolt sticking out of the top pulley. It is fully tightened and locked on the pole. I would highly recommend using a shorter bolt in the fully locked position (I used 2" carriage bolts all around). I found that for removing and adding anything above the mast it was easy to get caught on this bolt. As I attempted to extend the pole above the existing antenna this was a very annoying problem. Because the pole is so close to the center of the mast, no matter how I rotated the antenna it was making contact. I was able to force it past, but this bolt was awful.
So my kit fully assembled had some decent weight to it. I made my pole-to-mast attachment about 15 inches long. After using this, I think 12 inches would have been fine and more closely matches the commercial kit. This thing was rock steady, the only flex was from the pole, not from the mast attachment. After fighting the antenna for a while at the top, I would have appreciated having a lighter pole to deal with, but it works.
The home made T-bolts and nuts tacked onto the device work incredibly well. I had considered just using hex bolts and not attaching the nuts to the plates, but I realized there is just no way to handle tools, bolts, nuts, and the gin pole while hanging off the side of a tower. Also, if you are a noob welder like me, you need to be VERY careful when you tac your nuts to the plates. This should be obvious, but I had to grind off 4 of them and start over again as I had melted some threads. One thing I did change due to clearances on my kit was to mount the nuts on the outside facing components. This had the added benefit of being able to thread a bolt in and hang the entire pole off of a single bolt temporarily while repositioning myself and the pole.
Make sure you have enough rope, but that should be obvious. 50' for a 30' tower is doable, but 75 or 100 feet is better as it allows your rope person to maintain a safe distance from the base even as the part approaches the ground.
The last thing I would add is a drill hole or other attachment device to the mast mount so you can have a lanyard for attaching the rig to your belt or harness. It's not critical, but a nice thing I think I may do before using it again.
